Craft Buddy Brand Ambassador

Monday, 1 December 2014

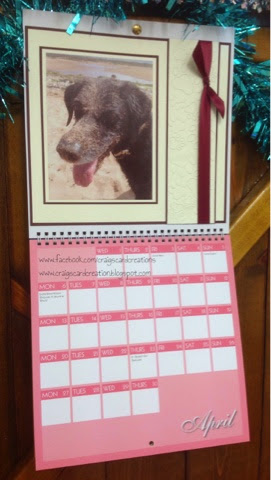
Stix2 Create your own Calendar - April 2015.

Good evening, Well its a late night for me tonight. As i am blogging i am attempting to stay up and cheer on Philip Schofield with his Text Santa 24 hour live feed. I am a big fan of Phil and i have been really enjoying it. will i be able to stay up? I dont know but i am taken this opportunity to get as much work as possible and typing some blog entries. 
So i am on the final stretch of this years create your own calendar. I am now onto April. like previous entries, i wanted to show that you can still create a lovely looking page with out lots of things being added. Matting and layering, bit of embossing and you have a lovely looking page. I do love the combination of wine coloured card and ivory/cream. just think it matches so well. Whether its a card, scrapbook page or material - it always is a match made in heaven. 
So the products i have used are:

Stix2 products;
9mm double sided tape - FPAL2732950.
Layer perfect metric - S57321.
6mm red liner tape - S57090.
Non stick craft sheet - S57132.
16mm Wine satin ribbon - S57216.

Additional products;
ivory textured card - Bazzill Basics.
wine textured card - Bazzill Basics.
Dog paw embossing folder - Darice, Crafters Companion.


stix2.co.uk
sales@stix2.co.uk

Craig x

Create your own calendar 2015 May.

Hello to all. Hope you have all had a lovely weekend. Sunday was a very quiet day resting after having a night out on the Saturday. Did get some things prepped and organised really to crack on with this week. Also for some ideas of projects to create in the early new year. All using stix2 goodies. Looking forward to getting cracking and get them blogged for all of you to see. 
 We are now on to May of stix2 create your own calendar. This is a very simple but bright edition of the calendar. The products I have used are as followed;

Stix2 products;
Create your own calendar 2015 - S57309.
Layer perfect metric - S57321.
1mm double sided foam pads - S57182.
5mmx5mmx3mm foam pads - S57083.
Micro dots (twin packs) - S57124.
Pick up pencil - S57265.
Non stick craft sheet - S57132.
9mm double sided tape - FPAL2732950.

Additional products;
Black textured card - Bazzill Basics.
Green textured card - Bazzill Basics.
Yellow textured card - Bazzill Basics.
White textured card - Bazzill Basics.
9mm bright yellow satin ribbon - American Crafts.
White card candi - Craftwork Cards.
Green Spectrum Noir pen - CG4.
Yellow Spectrum Noir pen - CT4.
Black fine liner pen.


www.stix2.co.uk
sales@stix2.co.uk

Craig xx


Thursday, 27 November 2014

Create your own calendar June 2015 - Stix2

Good afternoon, well we are creeping ever so closer to the New Year. 2015 is just around the corner. so scary to think where the year has gone. 
Its been a busy year especially towards the end of the year. I only work part tie in retail, i used to be management and work stupid long hours and now i think how did i have time to do anything back then. As iv said in previous post i have been lacking in my blogging but will be back blogging regularly in the new year. I have falling behind on my Create your Calendar by Stix2 but will have it all completed by Christmas, it has to be as it will be part of my mums Christmas presents. Here we go, here is June 2015. i have included a picture of myself and DJ as June is a special month because its my Birthday that month. Pleased excuse the tinsel around the remainder of my calendar months as i now have my decorations up and i have tinsel round my door haha. The products i have used for June 2015 are as followed;


Stix2 products;
Create your own calendar - S57309.
Layer perfect metric - S57321.
1mm double sided A4 foam pad sheet - S57182.
Non stick craft sheet - S57132.
9mm double sided tape - FPAL2732950.
PVA glue with metal tip - S56890.
5mm x 5mm x 3mm foam pads - S57083.
Silicone glue - S57100.

Additional products;
Ivory textured card - Bazzill Basics.
Brown textured card - Bazzill Basics.
Lace bloom dies - Die'sire Crafters Companion.
Card candi - Craftwork Cards.


Wednesday, 26 November 2014

A December to remember wedding card.

Good Afternoon. 
Iv been very bad and not blogging as of late, where is the time going? Been busy with Christmas commission cards, cards for fayres & cafés. All other commission cards and Hunkydorys recent collections. Just received the next one yesterday. 
 The ladies in Franco's cafe - where my cards are being sold, well some of the chefs is getting married next week and they ask if I would make a card, but also a box. The colour theme is cream and purple- cadburys chocolate purple. I really wanted to make it extra special. So I used my large score board from crafters companion aswell as their brand new flower die'sire die that was part of their 4 Day Deal shows last week. Could work out what topper to use so I decided on a Kanban love topper from their all occasion collection. To give it extra depth and touchy-feely I used my embossing folders and my tonic studios die, adding pearls and bows to finish it off. 
 The box was made by taken 2 pieces of 10 & 1/4 - ten and a quarter x 10 & 1/4 - ten and a quarter card stock. Then scoring at 1" all the way round. My base I used Centura pearl card stock and for the top I used the A3 elegant card stock both by Crafters Companion. I added some more flowers that I layered 3 times each, a sentiment in a tag - Done. 
 I was so pleased with how it turned out, especially the purple and ivory/cream colour. 
 The products I used are as followed;

Stix2 Adhesives products
9mm double sided tape - FPAL2732950.
6mm red liner tape - S57090.
Layer perfect Metric - S57321.
A4 foam pad sheet 2mm - S57182.
12mmx12mmx3mm foam pads - S57041.
PVA glue with metal tip - S56890.
Pick up pencil - S57265.
Non stick craft sheet - S57132.
Micro dots - S57124.
Silicone glue - S57100.
A4 die cut release sheet - S57316.
Low tack stencil tape - S56994.

Box
12mm red clear tape - S57091.
PVA glue with metal tip - S56890.
12mmx12mmx3mm foam pads - S57041.
Silicone glue - S57100.


Additional products 
Ivory textured card - Bazzill Basics.
Purple textured card - Bazzill Basics.
8x8 card blank - Craftwork Cards.
Bow circle die - Tonic Studios.
Lace bloom die - Craftwork Cards.
Love topper (Love & Marriage Collection) - Kanban Crafts.
Background paper (Love & Marriage paper pad) - Kanban Crafts.
Embossing folder - Free with Ebosser.
25mm Ivory satin ribbon - American Crafts.
9mm Purple satin ribbon - American Crafts.
5mm & 3mm pearls - Hunkydory Crafts.

Box
Elegance A3 double sided card - Crafters Companion.
Centura pearl A3 card with hint of silver - Crafters Companion.
Large A3 scoreboard - Crafters Companion.
Lace bloom die - die'sire Crafters Companion.
Ivory textured card - Bazzill Basics.
9mm Ivory satin ribbon - American Crafts.
5mm/3mm pearls - Hunkydory Crafts.


www.stix2.co.uk
sales@stix2.co.uk

Craig x


Tuesday, 11 November 2014

Party for tonight card & Gift combo.

Hello, Well iv been trying to think of different things to make and do, but as making cards are my passion, i wanted to make a a card that could also include something that would become a gift. I was in a High street store where i seen this plaque. Also in the back of my mind i have Stix2 magnetic discs in the back of my head as i have been wanting to create something using them too! Seeing this plaque, the idea just instantly came to mind. I starting off making a card but instead of using a feature image or topper, i worked around the size of a piece of black card that is a few millimeters bigger than the plaque. This will be attached to the card base and when the plaque is attached it will give it a mat and layer appearance. On the back of the plaque using Stix2 glue gun i have attached 6 magnet discs. On the back of those discs i attached a very small craft dot onto each magnetic disc, this enables the plaque to stick to the front of the card. The recipient once received the card can easily peel the plaque off the card and simple roll the sticky dots off using their finger. Now they have a keep sake magnetic plaque or can hang using the hanger it comes with.
On the 2nd mat and layer, the one that has the ribbon wrapped round, i have gone round the edges with the PVA glue with the metal tip. I have then left it to go tacky before tapping the gold shiny foil sheet around the area. 
It really is something quite special and different to give to a special friend or loved one.

Stix2 products used;
9mm double sided tape - FPAL 2732950.
12mm red ultra strong tape - S57091.
Layer perfect metric - S57321.
PVA glue with metal tip - S56890.
Hot melt glue gun - S57234.
Hot melt glue sticks - S57235.
Non stick craft sheet - S57132.
Ceramic magnetic disc (x6) - S57258.
Very small craft dots - S57115.
Shiny transfer foil sheets (Gold) - S57067.
16mm Lilac Satin ribbon - S57214. 

Additional Products used;
Totally girl 12x12 paper pad - My Minds Eye.
Black textured card - Bazzill Basics.
Ivory textured card (for box) - Bazzill Basics 
25mm Ivory Satin ribbon (for box) - American Crafts.
8x8 card blank - Craftwork Cards.
Elegance A3 card - Crafters Companion.
"Live for Today" plaque - high street store.
Bow maker - Embellishment attic.

This is the finished result with the plaque attached to the card using the very small dots.


This is what the card looks like without the plaque attached.


 This is the plaque as it could be used by hanging it.


 The plaque from the back with the 6 magnetic discs attached using the glue gun before the very small craft dots are attached.


As it is bulky i have created a box using my large A3 scoreboard from Crafters Companion. To create an 8x8 box that is 1 inch deep you will need card that is sized - 10 1/4 x 10 1/4 (Ten & a quarter x Ten & a quarter) and then score at 1" all the way around. 


 To decorate the box i simply added some matting and layering using the A3 elegance card from Crafters Companion, black card, Ivory ribbon and a wee panel that can be written on with the recipients name.


Craig x

Someone Special card and gift Combo.

Afternoon, hope everyone is well today. i seen this gorgeous wee poem with a keepsake heart when i was in a wee gift shop last week and instantly the ideas were ticking away. I thought it would be lovely to combine this with a card as well as it turning into a gift after. I have attached a magnetic disc the the back of the the "Someone Special" heart, and on the back of the disc i have attached a very small glue dot to attached it to the card. The heart easily removes off the card and using your finger, the glue dot just rolls off the back of the magnetic disc. I have also attached sticky backed photo orders to the poem tag so that it is held in place securely with out having to have any adhesives on the back. It means the poem tag can be easily slotted in and out should the recipient wish. This card i have made into a Birthday card but it could also be made into a Get Well card or a Just Because card. I really am pleased with the outcome of this project and hope everyone does to. 


Stix2 products used;
9mm double sided tape - FPAL 2732950.
12mm red ultra strong tape - S57091.
Layer perfect metric - S57321.
Hot melt glue gun - S57234.
Hot melt glue sticks - S57235.
Non stick craft sheet - S57132.
Ceramic magnetic disc (x6) - S57258.
Very small craft dots - S57115.
Photo mounting corners - 57072.
16mm Lilac Satin ribbon - S57214. 

Additional Products used;
Totally girl 12x12 paper pad - My Minds Eye.
Lilac textured card - Bazzill Basics.
White textured card - Bazzill Basics.
Green Textured card - Bazzill Basics.
A5 card blank - Papermill Direct.
Someone Special poem and keepsake - Gift shop.
3mm pearls - Kanban Crafts.
Bow maker - Embellishment attic.
Ivory textured card (for box) - Bazzill Basics 
25mm Ivory Satin ribbon (for box) - American Crafts.
Elegance A3 card - Crafters Companion.


TIP - 
Don't stick the corner mounts to tightly as it will be difficult to remove and insert the poem. Make sure they are spaced slightly bigger than the tag.


Here is a front view image of the finished card. 


Image of the card with both the tag and the heart removed off the card.


A view of the card placed inside a handmade box to make extra special.


Using my large A3 scoreboard from Crafters Companion to create an A5 box that is 1 inch deep, you will need 2 pieces of card both sized at 10 1/2" x 8" (Ten & half inch x Eight inch) and score at 1" all the way round. 


If you seen my last blog post with the Plaque card i made, here is a picture of both boxes i have made. 


I have 3 differnect poem gifts - Cherished Friend, Special Friend and Gran. If you would like one made using either of these, then please message me. They will also come in a hand made box and are priced at £7 with free P&P if posting. I will be getting some other titles soon so watch my blog or facebook page for details of when they become available. 


Craig x


Create your own Calendar - July 2015

Good morning, not a very nice day here up in Scotland. The heating is on and i think it will be on most of the day. I do love the autumn and winter, days like this, either get comfy on the couch with a good film or spend the day in my craft room working on samples - heaven. 
We are now coming into the half way mark for November, cant believe it. just seems like yesterday since i changed my calendars over to November. Time to create the next month with Stix2 create your own calendar 2015. Carrying on with the fun from the previous months. This month i kept it quite simple, i simply done matting and layer with a bit of embossing. Created like a patch work effect. What you could do, which i haven't is go round all the edges of the squares with a fine liner pen to create a stitch effect and that would really add to the effect of your page. i Need to get my skates on as i still have January - June to create. I think i will make a couple of month this week as i just have so much fun. As always, watch my blog to see what i do. 
Dont miss your chance to get a hold of your calendar. Order online where you will get it for £5.49 and its FREE P&P!

Stix2 products used;
Create your own calendar - S57309.
9mm double sided tape - FPAL2732950.
6mm red liner tape - S57090.
Layer perfect metric - S57321.
Pva glue with metal tip - S56890.
Non stick craft sheet - S57132.
1mm double sided A4 foam pad sheet - S57182.
Micro dots (Double pack) - S57124.
Pick up pencil - S57265.
A4 die cut release sheet - S57316.
Low tack stencil tape (tape down die) - S56994,

Additional products used;
Totally girl 12x12 paper pad - My Minds Eye.
Deep pink textured card - Bazzill Basics.
Centura pearl with hint of silver - Crafters Companion.
Stitch flower embossalicious embossing folder - Crafters Companion.
Butterfly die - Tonic Studios.
5mm & 3mm Deep pink pearls - Kanban Crafts.


www.stix2.co.uk
sales@stix2.co.uk

Craig x

Wednesday, 5 November 2014

Create your own calendar - August 2015.

Afternoon, I'm later in posting this blog for my August page of my Create your own calendar. The weeks just seem to rolling now, am posting this one now, but will have an extra addition of the calendar later in the week as July will have to be done too. I am have so much fun with this project, not only the creating of it but also the fun of looking through photos - old and new. Trying to decide which ones i'm going to use is very hard. I think as the last half of the calendar get done, i'm going to have to include more than one photo per month. I just so many i want to include. There is plenty of space on the calendar to add 2 or even 3 photo - depending on the side of course. i do like the focal point to be focused on the one photo element but like i say, i think i will need to rethink this in the next few additions. 
On this month, i have used the green seed bee'd and fine glitter packs. Each one comes in its own wee tube. I deliberately ordered them as i'm not a fan of glitter but i really loved the look of these and wanted to include them in my future projects. The way i done mine was added a thin layer of Stix2 PVA glue onto a piece of my card and then poured the green coloured seeds on top for them to adhere to, i wanted to make sure there would be a permanent bond hence why i used the PVA glue.

Stix2 products used;
Create your own calendar - S57309.
9mm Double sided tape - FPAL 2732950.
6mm Red ultra stong tape - S57090.
1mm A4 foam pad sheet - S57182.
Tri pack seed, bee'd and fine glitter - 57075.
Layer perfect metric - S57321.
5mmx5mmx3mm foam pads - S57083.
PVA glue with metal tip - S57890.
Pick up pencil - S57265.
Non stick craft sheet - S57132.
A4 die cut release sheets - S57316.
Low tack stencil tape - S56994.
16mm Hunters Green satin ribbon - S57215.

Additional products used;
Verso die - Tonic Studios.
Black textured card - Bazzill Basics.
Dark green smooth card - Bazzill Basics.
Cross hatch embossing folder - Crafters Comapnion.
Card Candi - Craftworks Cards.
Swirl die.
Bow maker - Embellishment attic.


www.stix2.co.uk
www.sales@stix2.co.uk

Craig x


Christmas with a Sparkle

Good morning. First off appologise for the delay with my August page of the Create your own calender, I will have it blogged today.Well Christmas is well and truly on its way isn't it. Halloween is over with, now just Bonfire night tonight then that's it, the official countdown to Christmas is on, well for a lot of people it is. For me the countdown to Christmas starts when The Xfactor starts. That's when i start to get everything organised. 
Its been very nippy here up in Scotland the past few days. It has been cold but its been really crisp all the way through the day. Had a lovely walk along the beach yesterday with DJ and i just sat on the rocks and looked out to the views of the never ending sea. 
So back to my post. I received the A4 self adhesive sparky acetate from Carol-Ann in the Stix2 offices last week. Its gorgeous and its shed free as people know i hate glitter, which is funny because i also ordered some of the glitters too. I couldn't resist as these glitters are so different, they are called See'd and Beed glitters. I thought i had to over come my annoyance of glitter and use them which i will over the coming samples. 
With this card i say i used the sparkly acetate. when using it with my dies, i thought it would be tricky to remove the backing cause of all the wee elements in the die cut but actually its not. Yes, if using dies you have to be patient when removing the backing sheet but the acetate it actually a good thickness and the backing removes quite easy from all the wee elements. The results really are spectacular irrelevant what kind of card or products to place the acetate onto. Its defo worth purchasing and trying it out.

Stix2 products used;
9mm Double sided tape - FPAL2732950.
19mmx38mmx2mm foam pads - S57137.
Layer perfect metric - S57321.
A4 Self adhesive Sparkly acetate sheet - S57303.
A4 die cut release sheet - S57316.
16mmx5m Wine Satin ribbon - S57216.
Non Stick craft sheet - S57132.
"Handmade By" label - S57261.

Additional products used;
Holiday die - Spellbinders.
Wine textured card - Bazzill Basics.
4mm White pearls - Mei Flower.
7x7 card blank - Craft UK.


TIP;
When removing the backing sheet off your Sparkly acetate. Don't remove it all at once. Remove the top first and stick onto your chosen area and slowly remove the backing sheet while ensuring there are no air bubbles left behind. 

Depending on what you are using, don't throw out the waste. As you can see from the die i have used, there is snowflakes, NOEL and JOY that are classed as the waste. Keep them and use them, these are also sparkly self adhesive elements. Make wee gift tags for your Christmas presents with these elements as the main focus point of your tag.

www.stix2.co.uk
sales@stix2.co.uk

Craig

Tuesday, 4 November 2014

Elegant Christmas Time A5 card.

Hello there, horrible morning here today. 
Recently i dug out all my old collections especially last years Hunkydory Christmas collection. These are all Design Team collections so there is an number of topper sheets that are all still unused. However, instead of using them, i have been making cards using all the elements and toppers that are left in the collection from previous cards iv made. By the end, all that's left in the collection packets are full topper sheets and background card. Its a good mission and challenge to use all the bits and bobs and create A6 cards aswell as 8x8 cards. Its a fun thing to do, as it pushes your craft limits and gets you thinking more of different styles you can make with all the left over toppers big or small. I have been really enjoying it. This card has been made from the Elegant Collections that was part of a Blockbuster in 2013.

Stix2 products used;
6mm Double sided tape - FPAL2732625.
12mmx12mmx3mm foam pads - S57041.
Layer perfect metric - S57321.
Silicone glue - S57100.
Non stick craft sheet - S57132.
6mm Red ultra strong tape - S57090.
"Handmade by" labels - S57261.
A5 cello bags - S57314.

Additional products used;
Sparkling tree topper - Hunkydory.
Co-ordinated background card - Hunkydory.
Purple textured card - Bazzill Basics.
Silver Mirri card - Anitas.
35mm black Silk ribbon - Own stash.
Bow maker -Embellishment attic.
Patina metallic gilding wax - Creative expressions.
"A magic time" Embossing folder - Couture Creations.
Card blank - Papermill Direct (A4 in half)
3mm Silver gems - Mei flower.


www.stix2.co.uk
sales@stix2.co.uk

Craig x

Magnificent Men Hunkydory 4 Day Deal.

Last week was another week prepping TV samples for Hunkydory launch of their new collection - Magnificent Men. It is a true honor to be on one of the UKs top papercraft companies Design Team. I do love other areas of craft such as stamping etc but Paper craft card making is where i started and its my passion. i just adore the collections that Hunkydory come out with. Sometimes i receive a collection and think its not my cup of tea but when i get started the fun just flows, that's what is magical about Hunkydory in opinion, how they manage to be able to convert me. For example, a previous collection - Fairy Sweathearts. Wouldn't of thought it was my thing - cute cartoon fairy characters but i had a blast creating samples. It really was fun with all the great bright colours and different elements in the collections. 
Men's collections dont come round often but then they do, HD goes all out and this 4 Day Deal collection is no exception. So many different yet traditional images for all ages. So versatile with what you can create whether its cards or projects or you can even incorporate them into scrapbook pages if you so wish. If you are into your collections and not bought this yet, it seriously worth going for. 
This card has been made by incorporating my own crafty stash and of course that means using my trusted Stix2 adhesives. Quite rightly all my HD samples for the Create and Craft shows must be used using their own products that are supplied to myself. When it comes to my own cards using the collections then i will always only ever use Stix2. 

Stix2 products used;
9mm double sided tape - FPAL2732950.
6mm red liner tape S57090.
Silicone glue - S57100.
Layer ferfect metric - S57321.
19mmx38mmx2mm foam pads - S57137.
Pick up pencil - S57265.
Non stick craft sheet - S57132.
A5 cello bags - S57314.
"Handmade by" labels - S57216.

Additional products used;
They think it's all over topper sheet - Hubkydory Crafts.
Coordinated background card - Hunkydory Crafts.
Frame from pleasure pastimes golf topper sheet - Hunkydory Crafts.
Mirri card - Anita's.
Ivory textured card - Bazzill Basics.
Ivory spiders web.
3mm gold gems - Mei flower. 


www.stix2.co.uk
sales@stix2.co.uk

Craig x

Tuesday, 28 October 2014

Pretty in Pink Stix2 Create your own Crackers.

Good morning, Well this cracker blog is an unexpected blog post. I will be posting part 2 of my Christmas crackers later today but last night i was making a baby girl card and thinking about baby gifts and how it can be presented in a different way (if its small enough). That's when the light bulb went off in my head. I though why do Christmas crackers have to made and used just for Christmas. How nice would it be if you were given a small baby gift in lovely decorated cracker. You could add the babies name and birth details on a little tag and attach it to the cracker. Just something a bit different to present a lovely little pair of socks or baby grow etc. I have not included the snapper in the this cracker as didn't think it was appropriate, but you can do that should you wish. 
The products i have used are as followed;

Stix2 products;
Silver crackers - S57247.
Hot glue gun - S57234.
Hot glue sticks - S57235.
6mm Red liner tape - S57090.
Non stick craft sheet - S57132.
Layer perfect metric - S57321.

Additional products;
Amelia 8x8 paper pad x2 - Craftwork cards.
smooth white card - Bazzill Basics. 
White spider web.
12mm Baby girl fabric ribbon.
25mm Pink satin ribbon - American Crafts.
9mm White satin ribbon. 


TIP
each panel of the cracker has 3 layers in total - 2 layers of good gsm paper from Craftwork Cards and card from Bazzill Basics so i suggest you should use some kind of object to help roll the cracker. Use something like a kitchen rolling pin as suggested in my previous blog. You will need to be patient if your are rolling the cracker un-aided but to me, the result is worth it. What new mum would appreciate a gift packaged like this?

Craig x

www.stix2.co.uk
sales@stix2.co.uk

Sunday, 26 October 2014

Stix2 - Create your Calendar. September 2015.

What a busy weekend its been and I haven't been in my weekend work as been on holiday. Busy in my craft room - not that I'm complaining, lots to do for Stix2, Hunkydory, commission cards as well as cards for the cafe and prepping for Christmas, I won't lie the Christmas films and music has been on, in actual fact I was watching Home Alone last night. Who says men can't multitask - please don't comment to that Haha. It really is the most wonderful time of the year. I love it. I never take it for granted, I know there's so many people and families out there who arnt as lucky as me. I may have a serious illness but I always thank my lucky stars when I'm keeping well as I am now. 
 The this project I have been doing isn't christmas related, well it is in the fact it will be given as part of a Christmas present, but the main design isn't Christmas. I am ofcourse talking about the next month of my Create your own calendar by stix2. We are now 9 weeks till 2015 and 8 months still to create. I will however need to do the 8 months in 8 weeks if I want to give it as a gift for Christmas. Today I have been creating the month of September. I kept it very simple but tried to use a number of Stix2 products, liked the idea of keeping it 2 toned. I have also kept it quite touchy feeling on parts, the Center square is a piece of double sided sheet (4"x4") and I have rubbed the clear plastic beads over the top. It gives it a glistering look without using glitter. The calendar really is a very special gift to make for someone special or if your a grandparent give it blank to a child to draw on so they can make pictures for their mum and dad and then that can be a great gift for the children to give to their parents at Christmas. There's endless possibilities. Once 2015 is over, cut the top half of your calendar off and   discard the months on the bottom then buy a blank 12x12 scrap book and simply stick each month on to a 12x12 piece of card and insert it into your folder - you now have a scrap book. Just go for it and have fun. The products I have used are as followed;

Stix2 products;
 Make your own calendar - S57309.
 6mm double sided tape - FPAL2732625.
 6mm red liner tape - S57091.
 Silicone glue - S57100.
 Layer perfect metric - S57321.
 Double sided A4 adhesive sheets - S57107.
 A4 die cut release sheets - S57316.
 Clear plastic beads - S57333.
 1mm A4 foam pad sheet - S57182.
 5mmx5mmx3mm foam pads - S57083.
 Pick up pencil - S57265.
 Non stick craft sheet - S57132.
 
Additional items used;
 Light tan card stock - Bazzill Basics.
 Ivory card stock - Bazzill Basics.
 Ivory card candi - Craftwork Cards.
 Paw print embossing folder - Darice.


Craig x

www.stix2.co.uk
sales@stix2.co.uk


Stix2 Create your own cracker - part1

Well i thought i better get my skates on and get blogging again. lots i'm wanting to get blogged for you all to see but iv just carried away creating and kept putting off blogging. 
I will be blogging crackers over 3 blogs posts. I have 5 different styles of crackers (& a blooper) i want to blog as well as some wee hints and tips so ill blog these over 3 posts to keep the posts to a minimum.
These crackers are simply awesome I have made crackers similar to these from different companies. The other were useless. Whats great about these ones is they roll very easily, the quality of the card stock is exceptional. The 2nd great thing is once you have rolled them, inserting the flaps into the other side, well it just slides right in with ease. No need for glue or tape to attach the panels.
I would say to any one who are thinking about making their own crackers then please try these, these are a must. I have kept a silver set for myself and my families Christmas table - which i will blog also when complete. They come in 4 colours - Gold S57246, Silver S57247, Red S57250, White S57249 and Stone S57248. 
Below are 2 different styles of crackers i have made.

CRACKER ONE

With this cracker i have kept it very simple, before rolling it, I have taken one of my verso dies (without the outer edge) and die cut the center. I placed a piece of green card behind the die cut image and attached with red liner tape and placed dots of pva glue beind the small holly leave elements. By doing this it does make the center of the cracker slightly thinker to roll so it just takes a wee bit of patience. 

Stix2 products used;
Gold crackers - S57246.
PVA glue with metal tip - S56890.
Low tack stencil tape - S56994.
3mm red liner tape - S57089.
Hot glue gun - S57234.
Hot glue gun sticks - S57235.
A4 die cut release sheet - S57316.
Non stick craft sheet - S57132.

Additional products used;
Christmas insert keepsake 2 dies (verso) - Tonic Studios.
Dark green text card - Bazzill Basics.
15mm Organza green with Gold stripes ribbon - American Crafts.

TIP
 If you find it difficult to roll your cracker, take a round object such as a kitchen rolling pin and roll your cracker around that. 

-
CRACKER TWO

With this cracker, i stepped up a gear. Not everyone is after this style of cracker for their tree or their dinner table but its nice to have a play and use all your own tools and stash and just go mad and have fun, that's what its all about. Crackers can look smart, even leaving them natural but use your border punches or border die to create a fancy edge for your crackers. It just makes them a tad bit more funky for Christmas. 

Stix2 products used;
Gold crackers - S57246.
3mm red liner tape - S57089.
6mm red liner tape - S57090.
Hot melt glue gun - S57234.
Hot melt glue sticks - S57235.
Non stick craft sheet - S57132.

Additional products used;
Border punch - Tonic Studios.
6mm wire edge red & gold organza ribbon - Own stash.
13mm wine satin ribbon - American crafts.
10mm Gross grain polkadots ribbon - American crafts.
Bow maker - Embellishment attic.

-

TIP's
These are tips that i personally find makes making the crackers slightly easier.


Using my Ultimate Pro board from Crafters Comapnion, i possition my cracker to left against the butt of the edge ensuring the tab of the cracker is pointing up as you can just seen in the above picture (Top Left). I then score to the left and right of the diamond cut outs at 2 7/8 (two and seven eighths) and then again at 4 7/8 (four and seven eighths).


-


Once scored on both sides of your cracker, it will look like this (ABOVE)

-


Once you have rolled your cracker and attached it together your cracker should help itself take shape of a cracker. Insert your snapper and then take your ribbon, twine, raffia etc and tie your edges. Remembering to keep one end open until you have placed any gifts etc in, should you wish to do this.


once my cracker is complete and the snapper is inside, I add a dot of hot glue inside the end of the cracker and secure the ends of the snapper. Doing this ensures that the snapper stays attached to your cracker while its being pulled. 
PLEASE DO NOT PLACE YOUR HOT GLUE GUN/HOT GLUE NEAR THE CENTER OF THE SNAPPER AS ITS STILL CLASSED AS AN EXPLOSIVE.                                               Not that an explosion should happen, just a very big bang will. Stay safe and don't chance it.

I will blog part 2 tomorrow. 

Craig x


www.stix2.co.uk
sales@stix2.co.uk